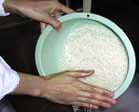
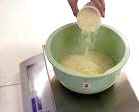
It is desirable to accurately weigh the rice with a scale
(as the quality of cooked rice tends to vary if not weighed). If using a
measuring cup, make sure to level off the top, as the cup tends to
yield an amount different from the desired amount.
The type of rice used is optional, depending on taste. However, the following conditions should be maintained:
a. [Bad] grains should be kept to a
minimum ([bad] grains are those that are white-cored, broken, cracked,
immature, or grown under adverse conditions).
b. The rice should be properly milled, leaving a sheen on the kernels with no bran residue on the germ.
c. Sufficient moisture set at a level
higher than 14% is preferred. Sufficient moisture protects against
cracking during water absorption, but too much water gives rise to mold.
d. The rice should have been milled less than a week before the date of cooking.
e. The optimum amount of rice to be cooked at once should be no more or less than about 80% of a rice cooker's capacity.
2. Rinse the rice
|
 |
First, add water to the measured rice and drain quickly. Next, add water one more time and wash the rice gently so as not to break the grains, then drain. Repeat the second procedure a few more times (about three times in all).
If using an automatic rice washer, set the operating time at less than three minutes.
|
|
 |
Immediately after rice has had contact with water, the
water starts permeating the rice, which also transports the bran content
into the kernels, so the first washing and draining should be completed
swiftly.
Modern, advanced milling techniques allow only a small amount of bran
residue to remain on the refined grains. Therefore, care must be taken
not to scrub the rice, which causes cracking, but to lightly "rinse" the grains.
3. Soak the rice
|
Let the rice soak in the water long enough so that the water reaches the innermost part of the grains. Suggested times for soaking are one hour in summer, two hours in winter.
When soaking is completed, the weight of the rice increases by 1.25 to
1.30 times that of the uncooked rice, and the rice becomes powdery when
strongly rubbed together between the fingers.
4. Add water to the rice
|
 |
Drain the water after soaking is finished, and add fresh water
before cooking. The amount of the water added depends on taste; however,
a rule-of-thumb is shown below:
Soaking and adding water are regarded as one step. Note the following formula:
[The amount of water absorbed during soaking + the amount of water added (before cooking) = Total amount of water to be added]
The suggested amounts of total water to be added:
a. sushi_rice(Sticky Rice)
: The weight of the dried rice x 1.30 - 1.35
(for example): Rice 3.6Kg(7.9lbs)
After soaked weight 4.6Kg(10.1lbs)=1kg(2.2lbs) of Water absorbed
3.6Kg x 1.30 = 4.68Kg(10.3lbs)(Total amount of water)
So,adding water is 4.68Kg - 1Kg = 3.68Kg(8.1lbs) |
If the cooked rice is to be kept in a chilled room, add extra water to
the rice, depending upon the conditions of the room. (Sushi seasoning
should be included in this amount.)
b. Cooked Rice
The weight of the dried rice x 1.40 - 1.50(for steamed rice)
*The amount of water added
If soaking conditions are standardized, it is acceptable to use the
amount of water added to the soaked rice as a yardstick. The appropriate
amount of water to be added fluctuates greatly, depending upon the
quality of rice. If changing the type of rice or switching from old to
new harvest grains, and vice versa, the rice should be test-cooked to
check for the optimum amount of water to be added.
*The quality of water
Rice cooked in hard water tends to be harder, but the quality of water
does not pose specific problems unless it is of an extreme hardness. Any
chlorine smell may be effectively removed with a water purifier.
5. Steam the rice
|
Select an appropriate heat control according to the directions on the automatic rice cooker.
Monitor the time needed to allow the rice to [settle]. It is
indispensable to allow time for the rice to settle, in addition to the
cooking process, in order to obtain the necessary amount of heat to cook
rice.
Cooking (or heating) time is typically 20 to 25 minutes,(1)
The time needed for rice to settle is typically about 20 to 30 minutes.(2) After finished
20 to 25 minutes
(1)Heating Start |
Heating Finish |
about 20 to 30 minutes
(2)For rice settle |
The reasons why rice should be allowed to settle after cooking are as follows:
[1] Moisture distribution in the cooker is
uneven immediately after cooking. By allowing time for the rice to
settle, any extra moisture on the surface of the grain is evaporated,
thus evening out the moisture content of each grain.
[2] Gelatinization is incomplete unless
the rice is kept at a temperature higher than 98degrees Celsius, or
about 210 degrees Fahrenheit, for approximately 20 minutes. The cooking
process alone does not provide enough heat (a temperature over 98degrees
Celsius), a condition which is compensated for by allowing time for the
rice to settle.
Maintain a high surrounding temperature while allowing rice to settle.
When the rice is allowed to settle for too long, it loses sheen. When it
cools down, it becomes sticky, making it difficult to separate
individual grains from each other.
6. Add Sushi Seasoning to the rice
|

Sushi Seasoning |
Wet a wooden rice-cooling tub, or HANGIRI, and pour the cooked rice
in it. Sprinkle the prepared vinegar mixture(Sushi Seasoning)over the
rice while hot (the temperature of the rice should be over 90degrees
Celsius, or about 190 degrees Fahrenheit).
Fluff with a rice paddle, by moving it from the bottom up, to coat the
rice evenly with vinegar. Quickly break up any chunks with the paddle to
prevent [balls] from forming.
Use a gentle cutting motion of the paddle, rather than mixing the rice
into a paste. At the same time, fan it with a rice-cooling fan, or
UCHIWA, to cool it down slightly.
If the temperature of the rice is too low when adding Sushi
Seasoning, the rice becomes sticky, forming hard-to-separate [balls].
Furthermore, the rice loses its sheen and its surface becomes rough.
7. Cool the rice
|
It is recommended to keep the rice at [body temperature], between 30 and
40degrees Celsius (approximately 86 to 104 degrees Fahrenheit), for
[molding], or forming the rice into various shapes. Control the cooling
process so as to reduce the temperature to this range at the time of
molding. High temperatures may cause water condensation in the rice
container, leading to stickiness and discoloration of rice. To avoid
this, the rice should be slightly cooled to at least 60degrees Celsius
(132 degrees Fahrenheit) prior to molding.
8. Mold the rice
|
|
Be careful not to smash the rice grains and make them too sticky. It is
desirable to keep the sushi_rice at body temperature between 30 and
40degrees Celsius (about 86 to 104 degrees Fahrenheit) for molding. If
using a molding machine, it is helpful to add salad oil to the rice
before cooking, or spray it onto the machine to enhance its performance.
|
|
|
|
|
|
|
| | |
(*)(for example): Rice Cooker Maximum Capacity 5.6L (1.43 Gallons) = 4.5Kg(9.9lbs) Maximum
Desirable Rice Weight 3.6Kg(7.9lbs) |
|
Tidak ada komentar:
Posting Komentar